Setting Up Google Tag Manager and Google Analytics 4 for Your Website: A Beginner’s Guide

Tag managers streamline the deployment and management of tracking codes, or tags, on websites and apps without requiring direct code changes. This simplifies the process for marketers and analysts, reducing reliance on developers while ensuring faster implementation of analytics, advertising pixels, and other tracking scripts. With a tag management system (TMS) like Google Tag Manager, teams can efficiently manage multiple tags from a centralized interface, improving workflow efficiency and accuracy.
For businesses, tag managers enhance data consistency and performance by reducing the risk of human errors, duplicate tags, or outdated tracking codes. They also improve website speed by controlling how and when tags fire, preventing unnecessary loading delays. Additionally, a TMS allows for better compliance with privacy regulations by enabling easy updates to consent settings, ensuring that data collection aligns with evolving legal requirements.
Google Tag Manager and Google Analytics
From a marketing perspective, tag managers provide agility and deeper insights. Without IT support, marketers can quickly deploy new tags for campaign tracking, A/B testing, and customer journey analysis. This enables data-driven decision-making in real-time, allowing businesses to optimize marketing efforts, personalize user experiences, and measure ROI more effectively. The first tag to deploy is typically Google Analytics when implementing tag management.
This comprehensive guide will walk you through setting up Google Tag Manager (GTM) and Google Analytics 4 (GA4) for your website, even if you’ve never done it before. We’ll also explore events, key events, and strategies for optimizing tag firing.
Table of Contents
Part 1: Understanding the Basics
Before diving into the how, let’s understand the what and why.
- Google Tag Manager (GTM): GTM is a free tool that allows you to easily manage and deploy marketing tags (snippets of code) on your website without modifying the code directly. This simplifies adding and updating tracking tools, conversion pixels, and other scripts. Think of it as a container for all your website tracking needs. This makes it easier for marketers to manage tracking without needing a developer for every change.
- Google Analytics 4 (GA4): GA4 is the current version of Google Analytics, Google’s powerful website analytics platform. It provides insights into how users interact with your website, helping you understand your audience, track conversions, and make data-driven decisions. GA4 is designed to be more flexible and privacy-focused than previous versions, offering enhanced cross-platform tracking and machine learning-powered insights.
GTM makes managing GA4 (and other tracking tools) significantly more manageable. Instead of manually adding the GA4 tracking code to every website page, you can use GTM to deploy and manage it. This simplifies the process, reduces errors, and gives you greater control over your tracking setup.
Part 2: Create a Google Tag Manager Account
This section covers creating your GTM account and adding the GTM container snippet to your website.
How:
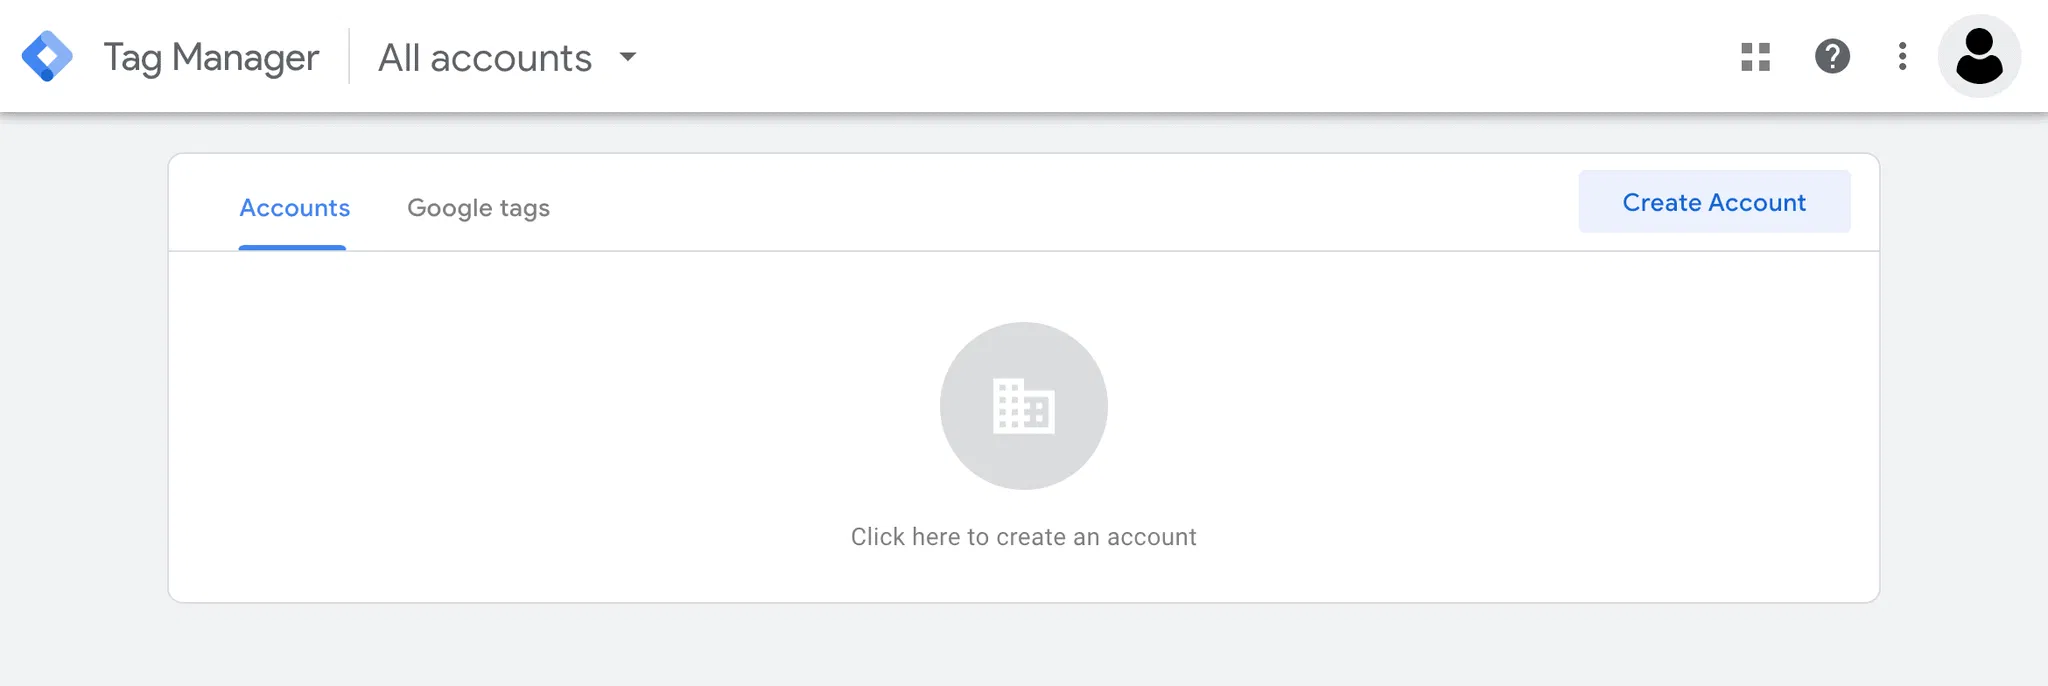
- Create a GTM Account: Sign into Google Tag Manager with your Google account, and click Create Account.
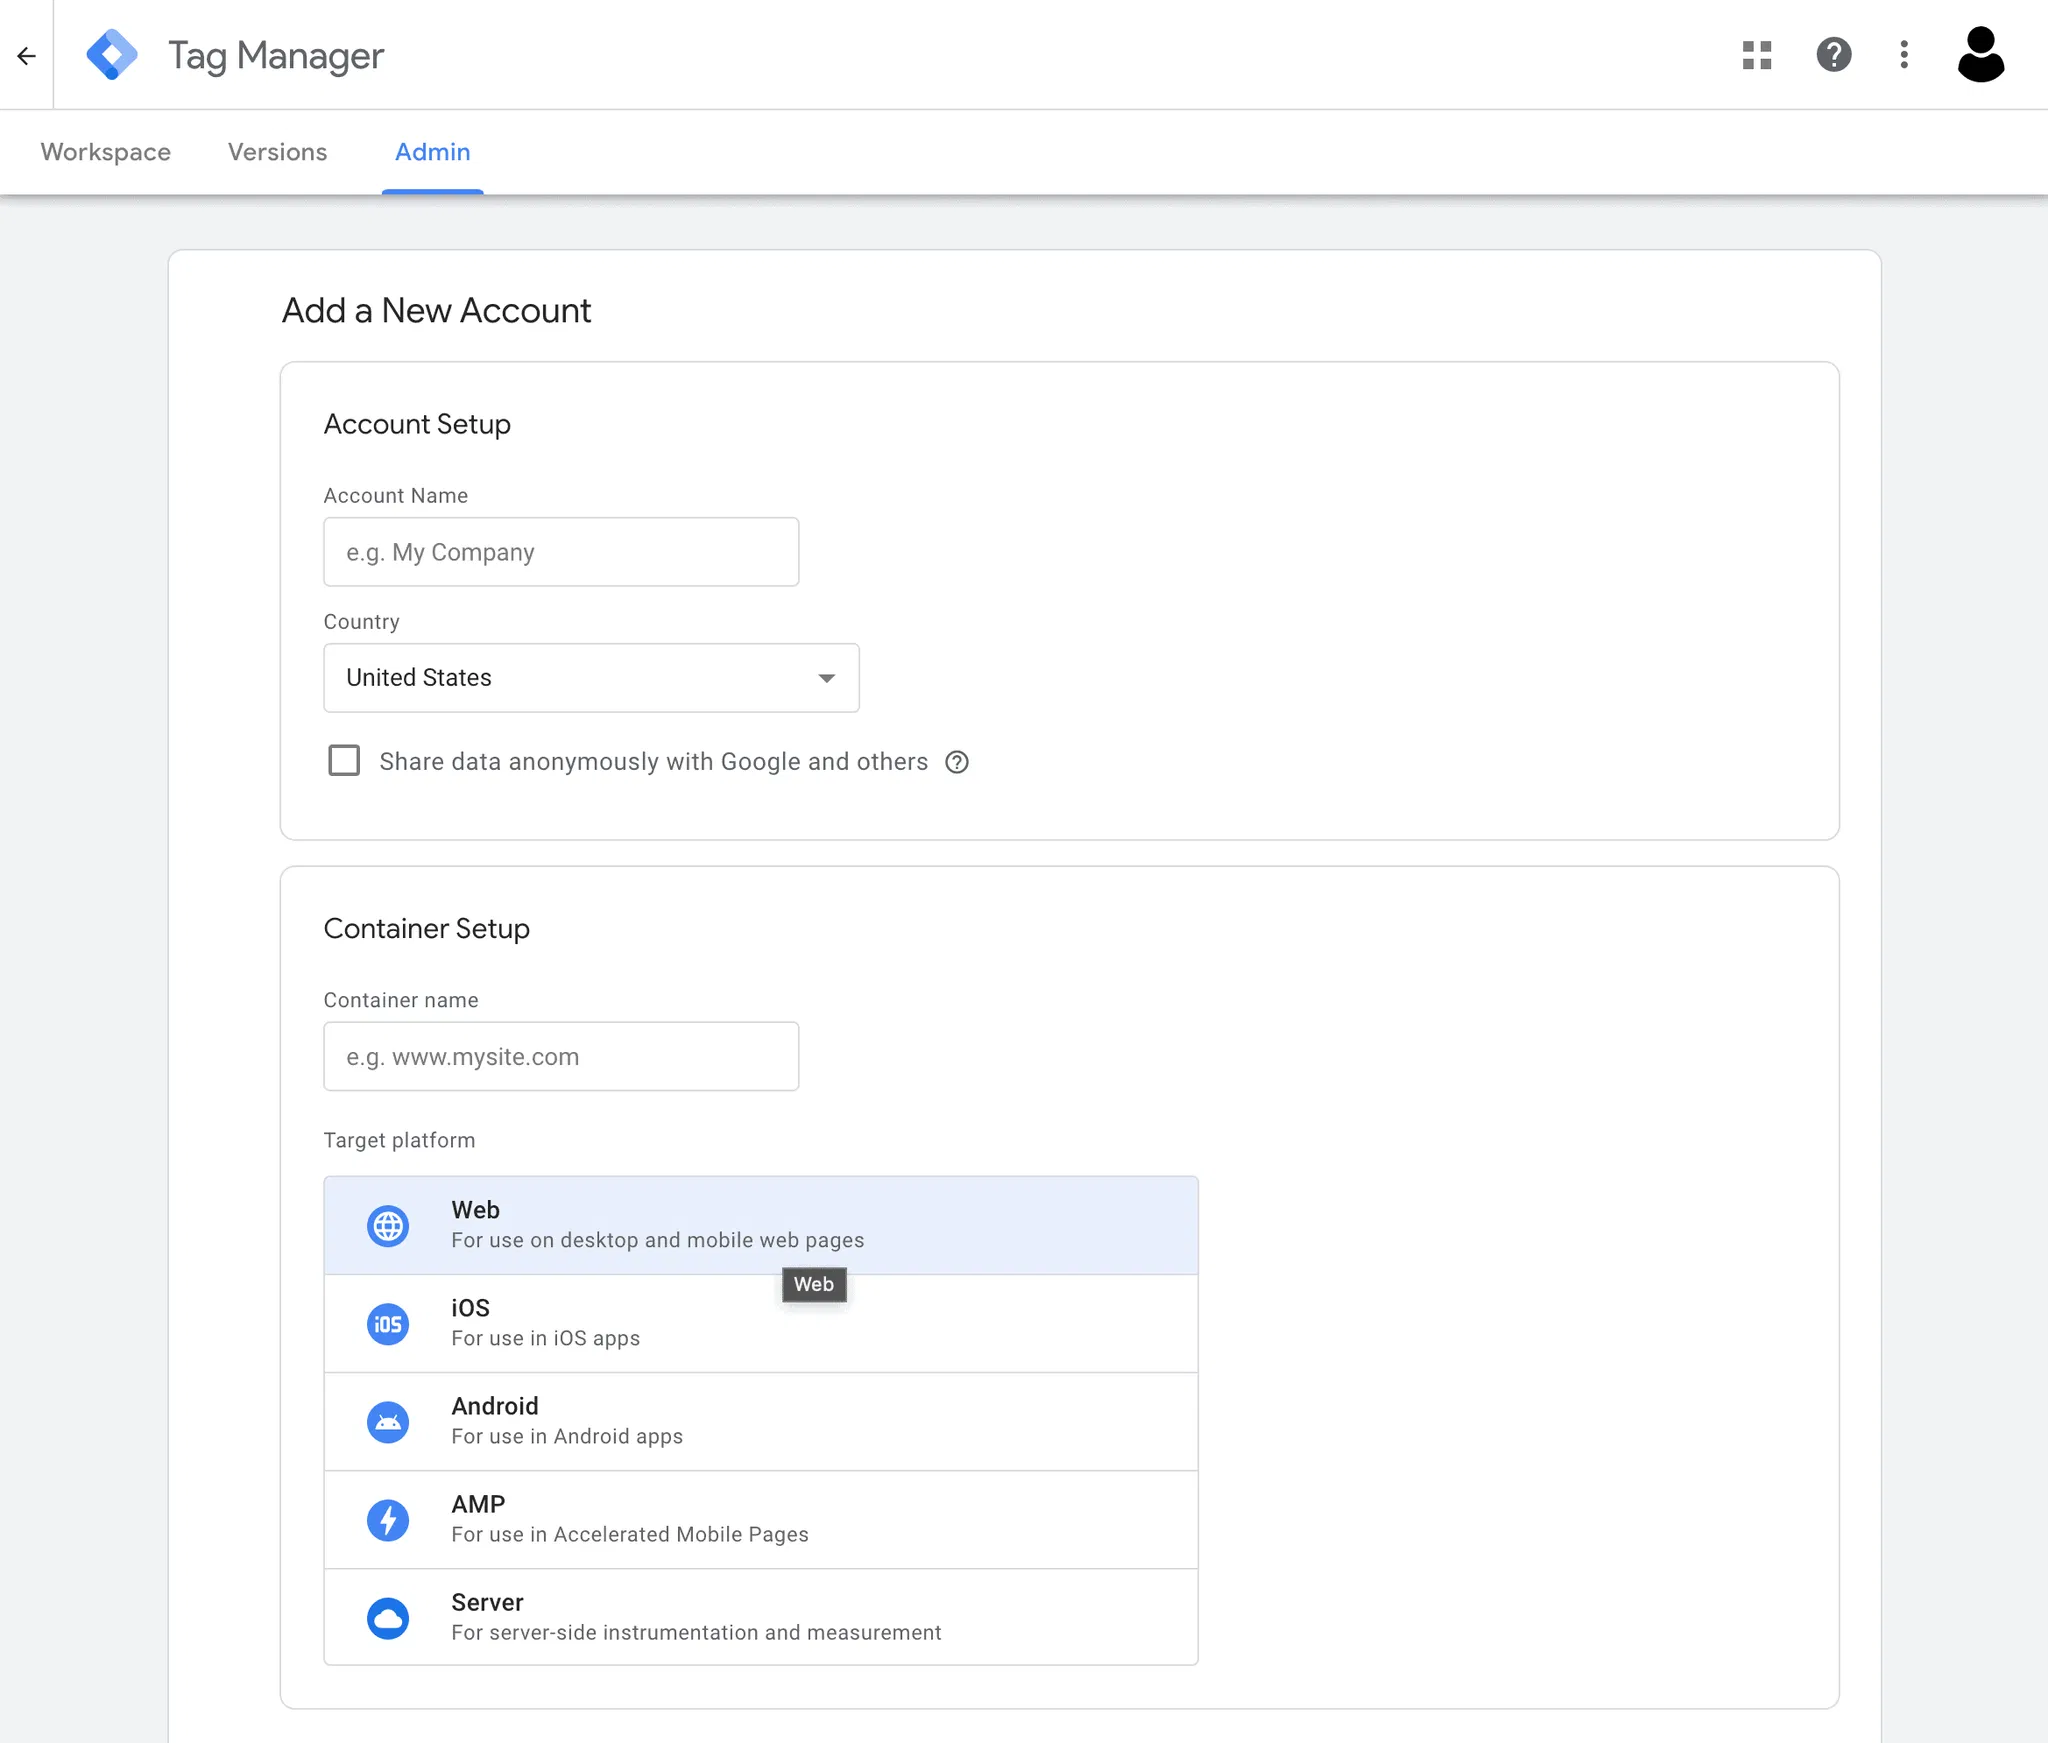
- Account Setup: Enter your company name and the country of your business. Agree to the terms of service.
- Container Setup: In a tag management system, a container is a snippet of code added to a website or app that houses all tracking tags, triggers, and variables in one place. It allows marketers to manage and update tags dynamically through a centralized interface without modifying the site’s core code. Provide a descriptive name for your container (e.g., Website Name). Choose Web as the target platform.
- Install Your Code: Google Tag Manager (GTM) requires the installation of two scripts: a JavaScript snippet (
<script>) placed in the<head>section and a noscript iframe (<noscript>) placed within the<body>tag, typically right after the opening<body>tag.- The JavaScript snippet in the
<head>ensures that GTM loads as early as possible, allowing it to fire tags efficiently and capture data immediately when the page starts loading. - The noscript iframe serves as a backup for users with JavaScript disabled, ensuring that GTM can still load and function in a limited capacity. Proper placement is crucial because if the scripts are misconfigured, it can lead to delays in tag execution, incomplete tracking, or even data loss.
- The JavaScript snippet in the
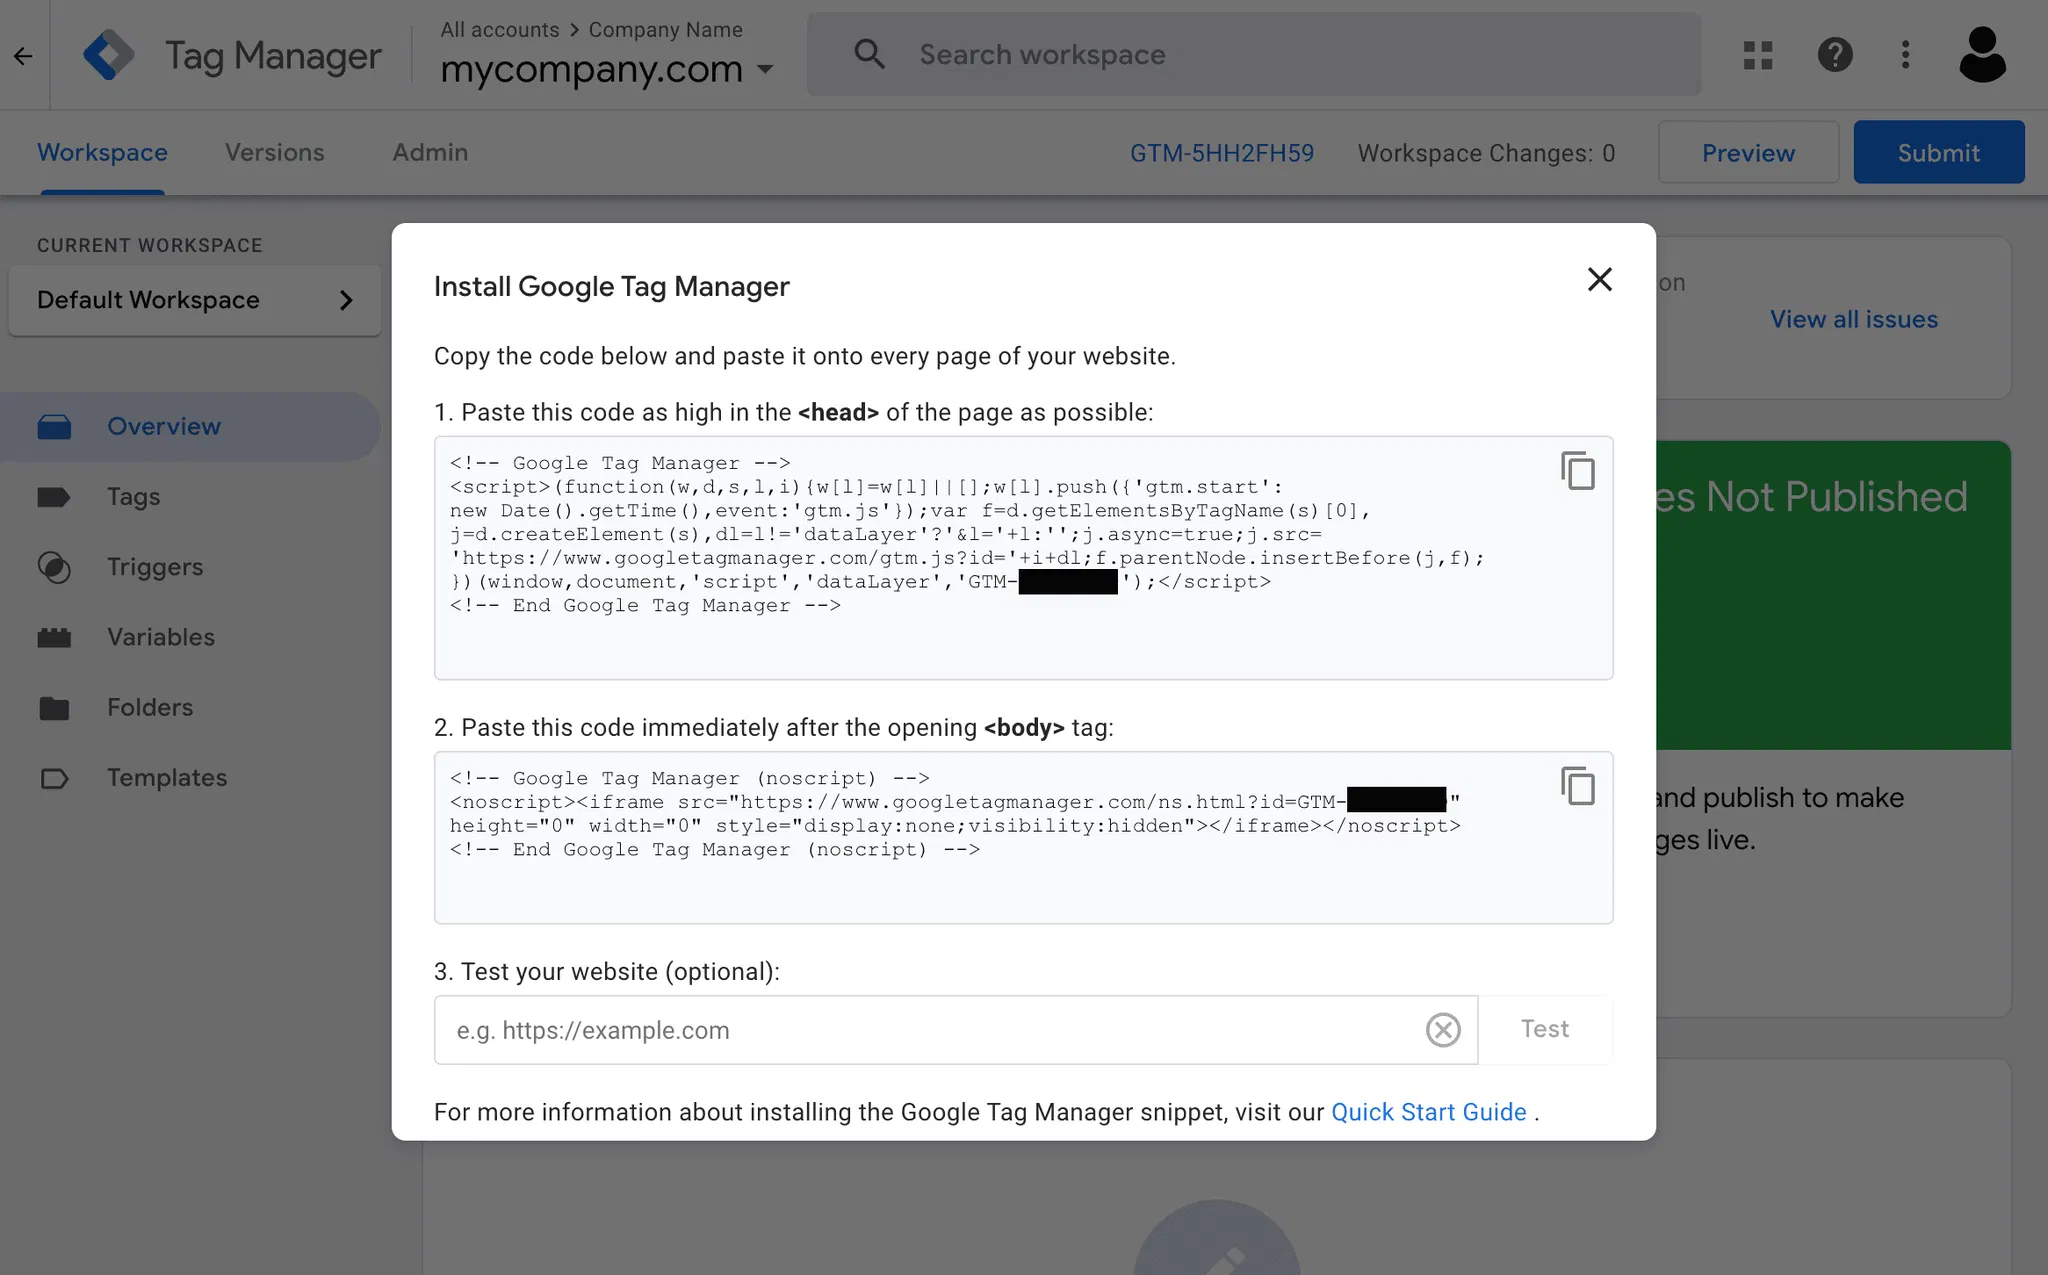
- Test Your Website: Test your website using the internal testing tool and it will let you know that the scripts were installed properly.
Most Content Management Systems (CMS), such as Wix and Squarespace, have plugins or dedicated fields within the theme settings to insert these code snippets easily. If your corporate site is WordPress, I’d highly recommend using the official Google Site Kit plugin. Otherwise, if you manage your site’s code directly, copy and paste the snippets into the appropriate locations in your HTML files.
Congratulations, Google Tag Manager is installed!
Part 3: Create a Google Analytics 4 Account
This section covers creating a GA4 account and property and acquiring your Measurement ID.
- Sign Up for Google Analytics: Go to Google Analytics and login.

- Create a GA4 Account: Create an account (typically your corporation)
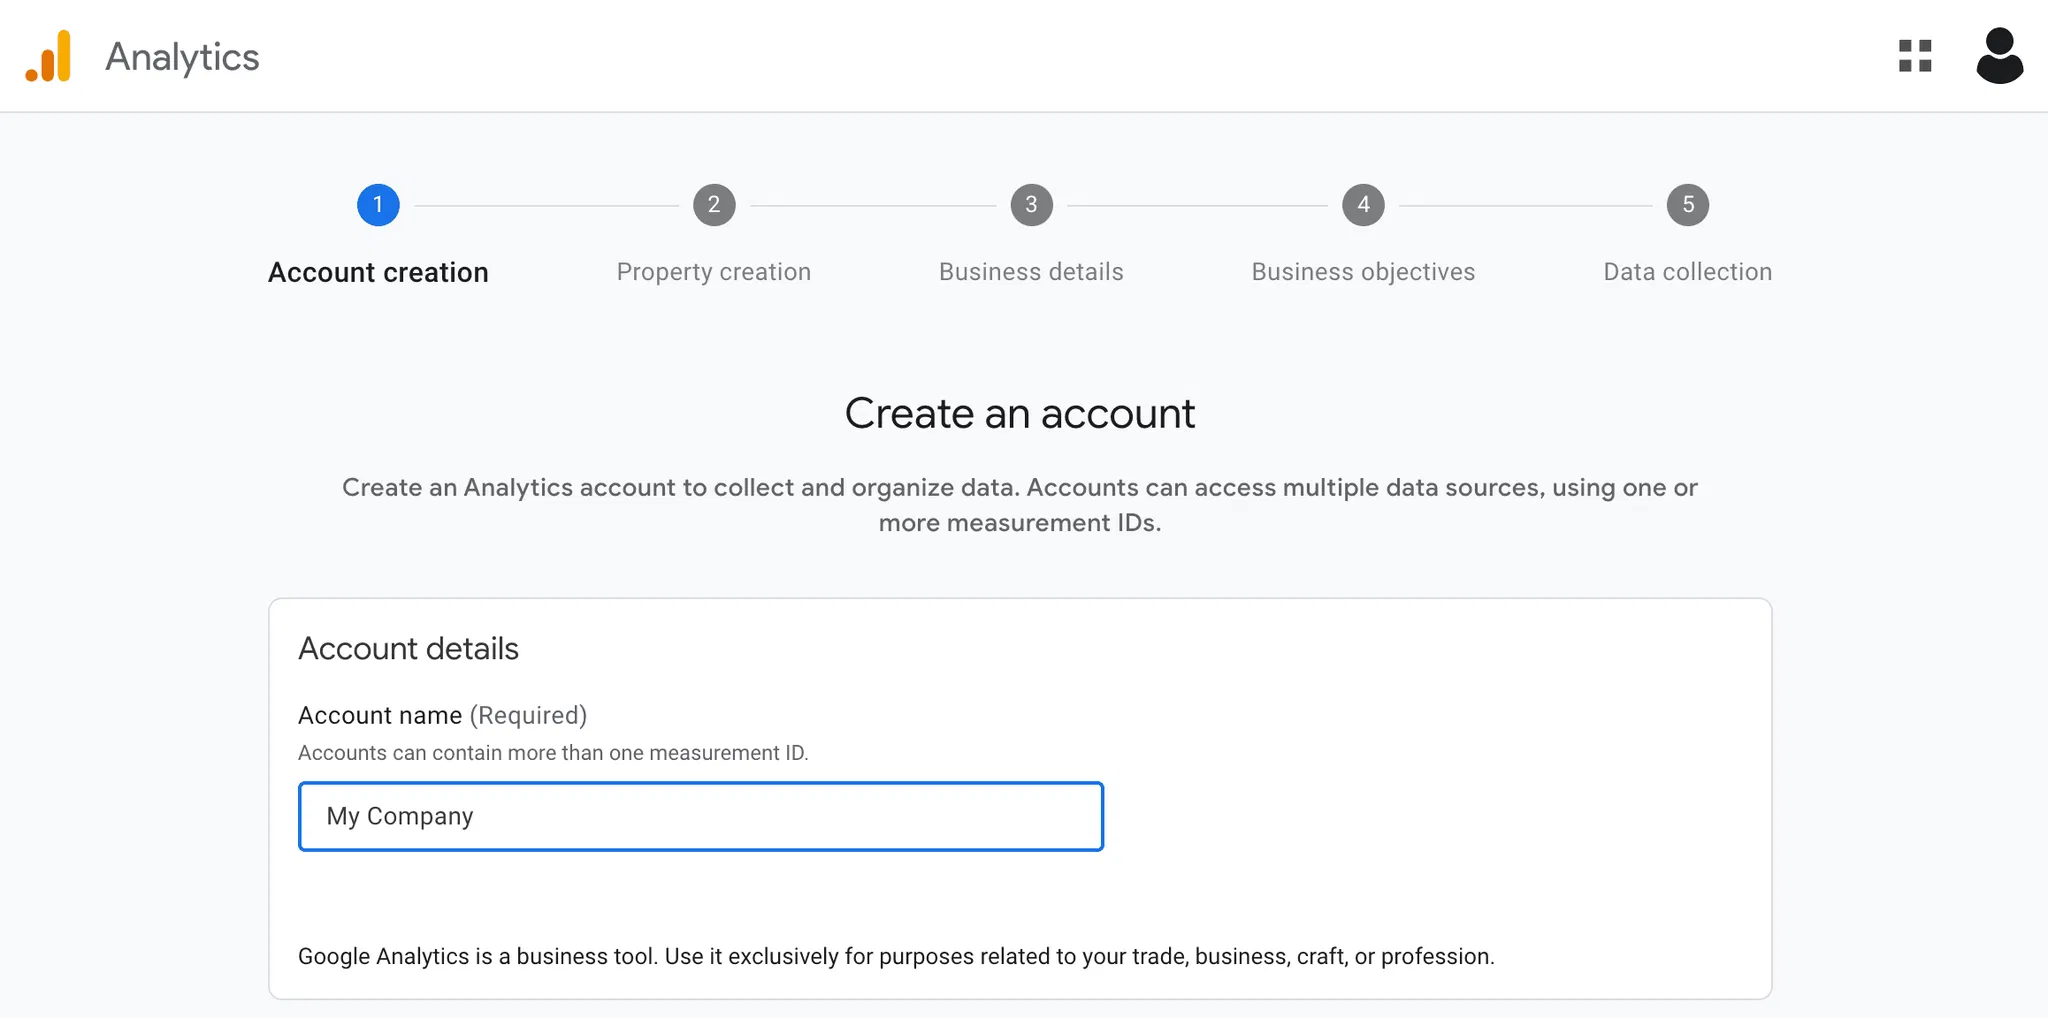
- Create a Property: Add your website and complete the remaining wizard steps. Be sure to set your time zone! (Note: if you are already using an older version of Google Analytics, creating a GA4 property will run alongside it, not replace it)
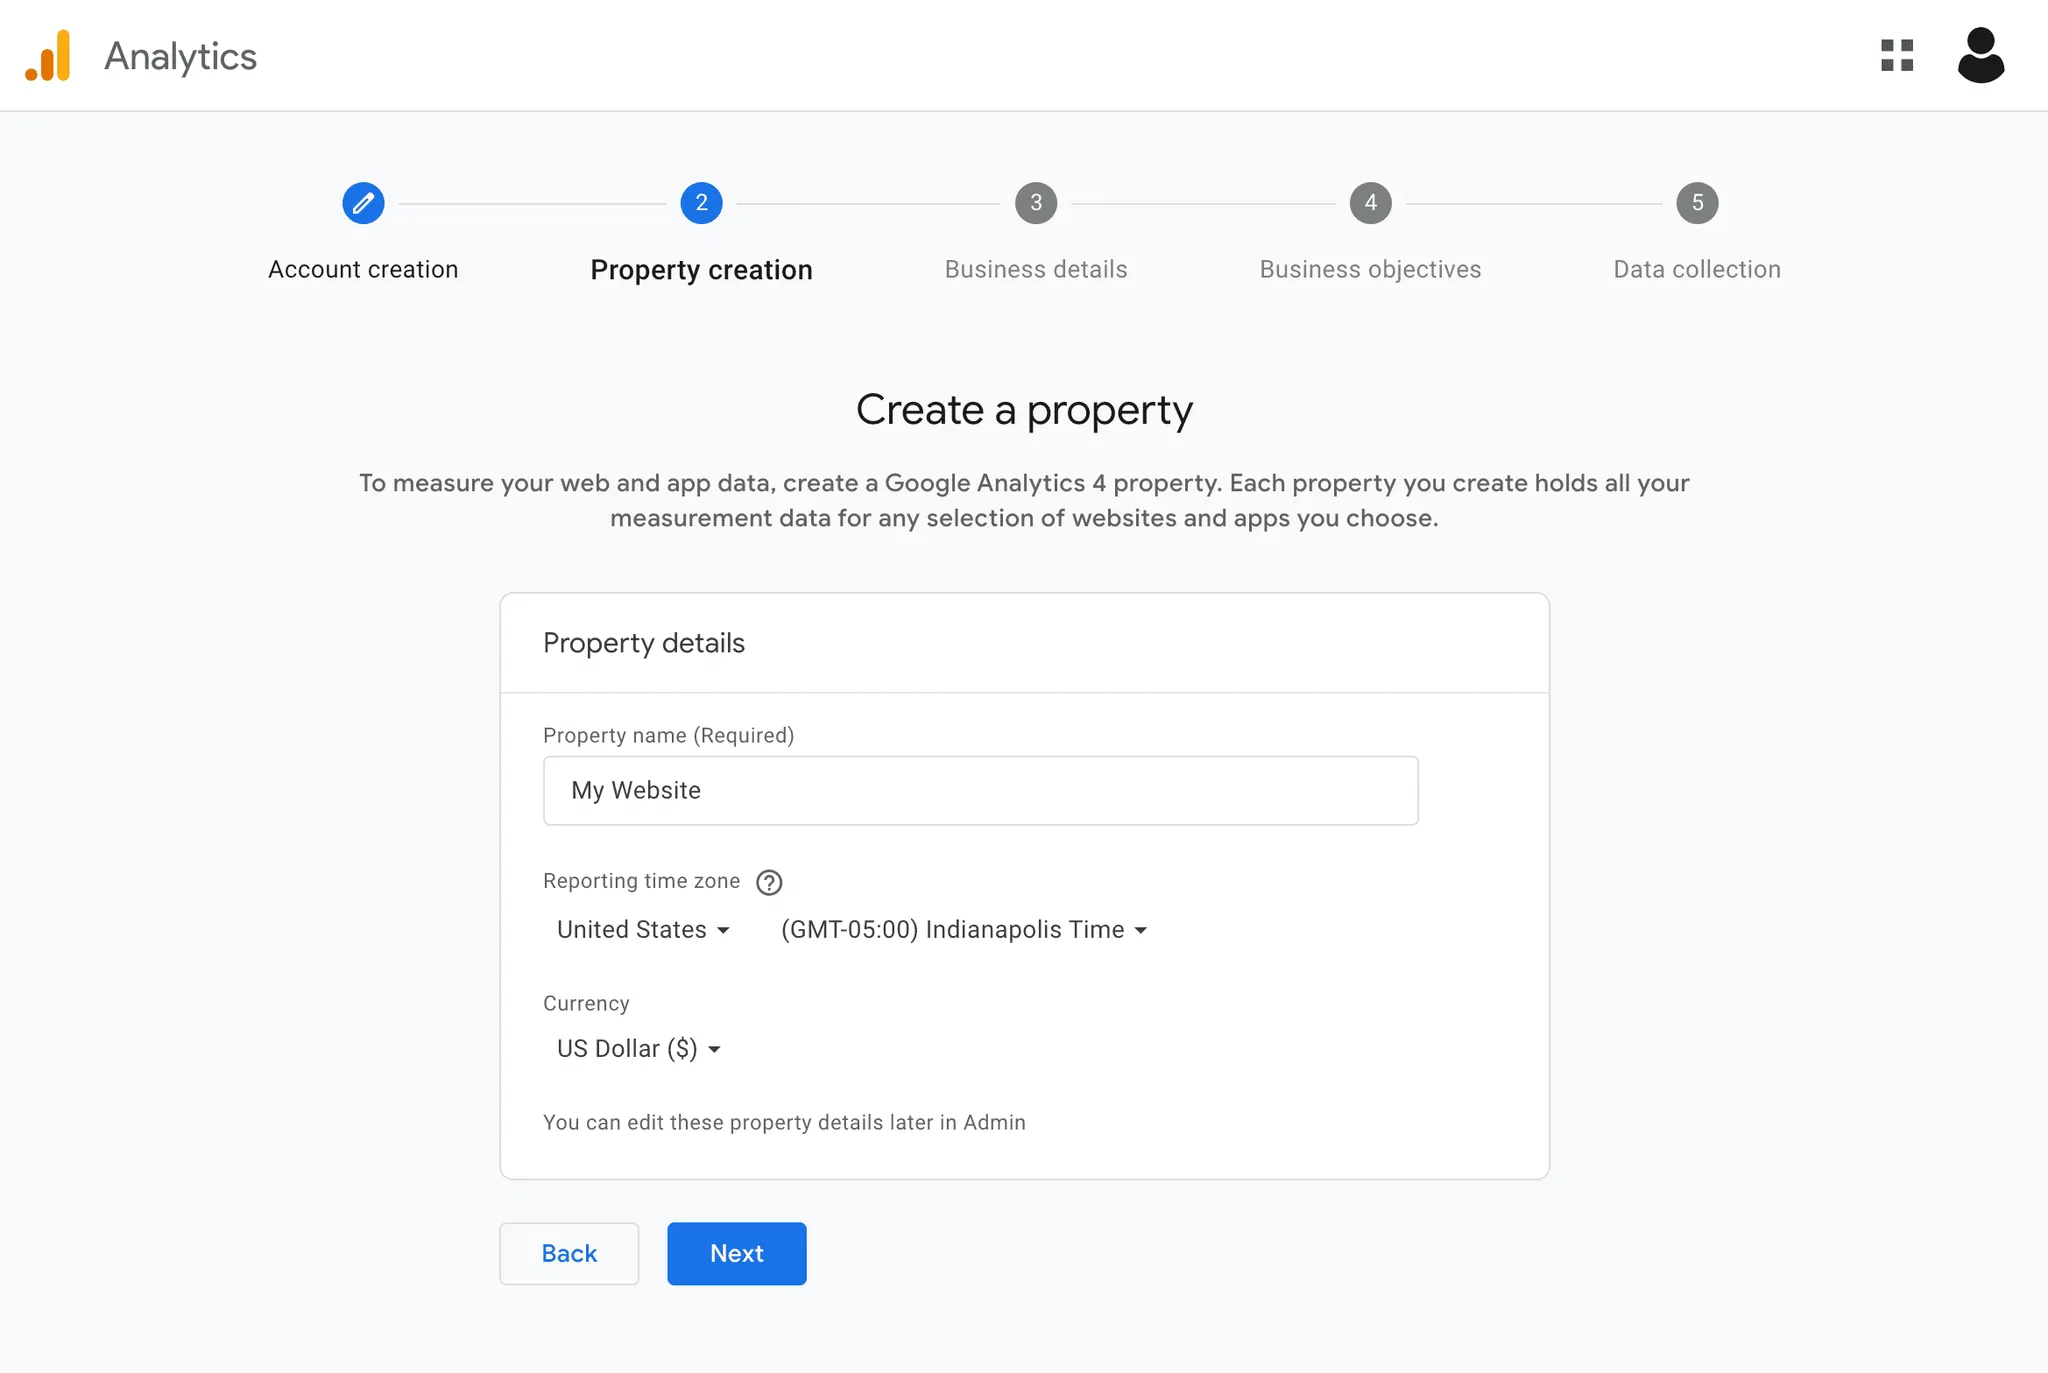
- Complete the Wizard: Set your business details and objectives. This will pre-select some Google Analytics options tailored to your industry and business goals. Accept the Terms of Service.
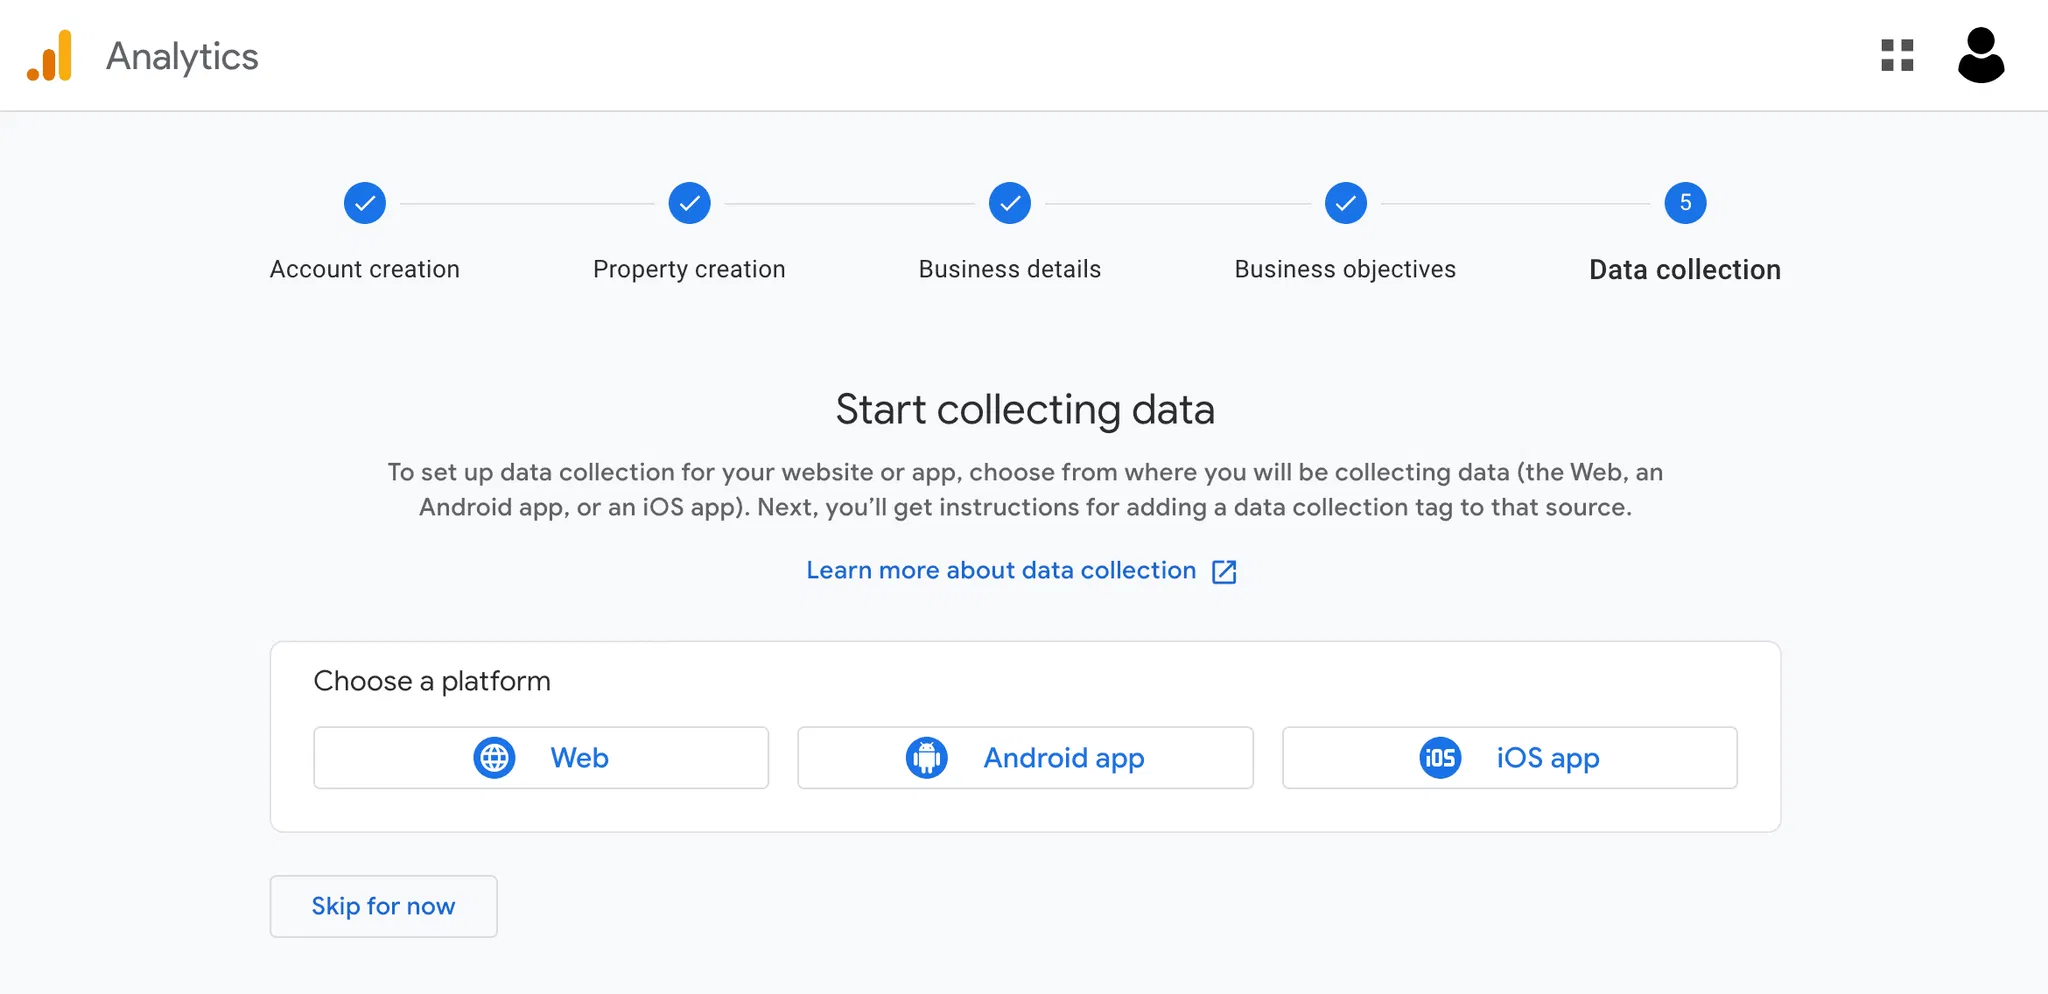
- Set up Data Stream: Within your GA4 property, navigate to “Data Streams” and choose “Web.”
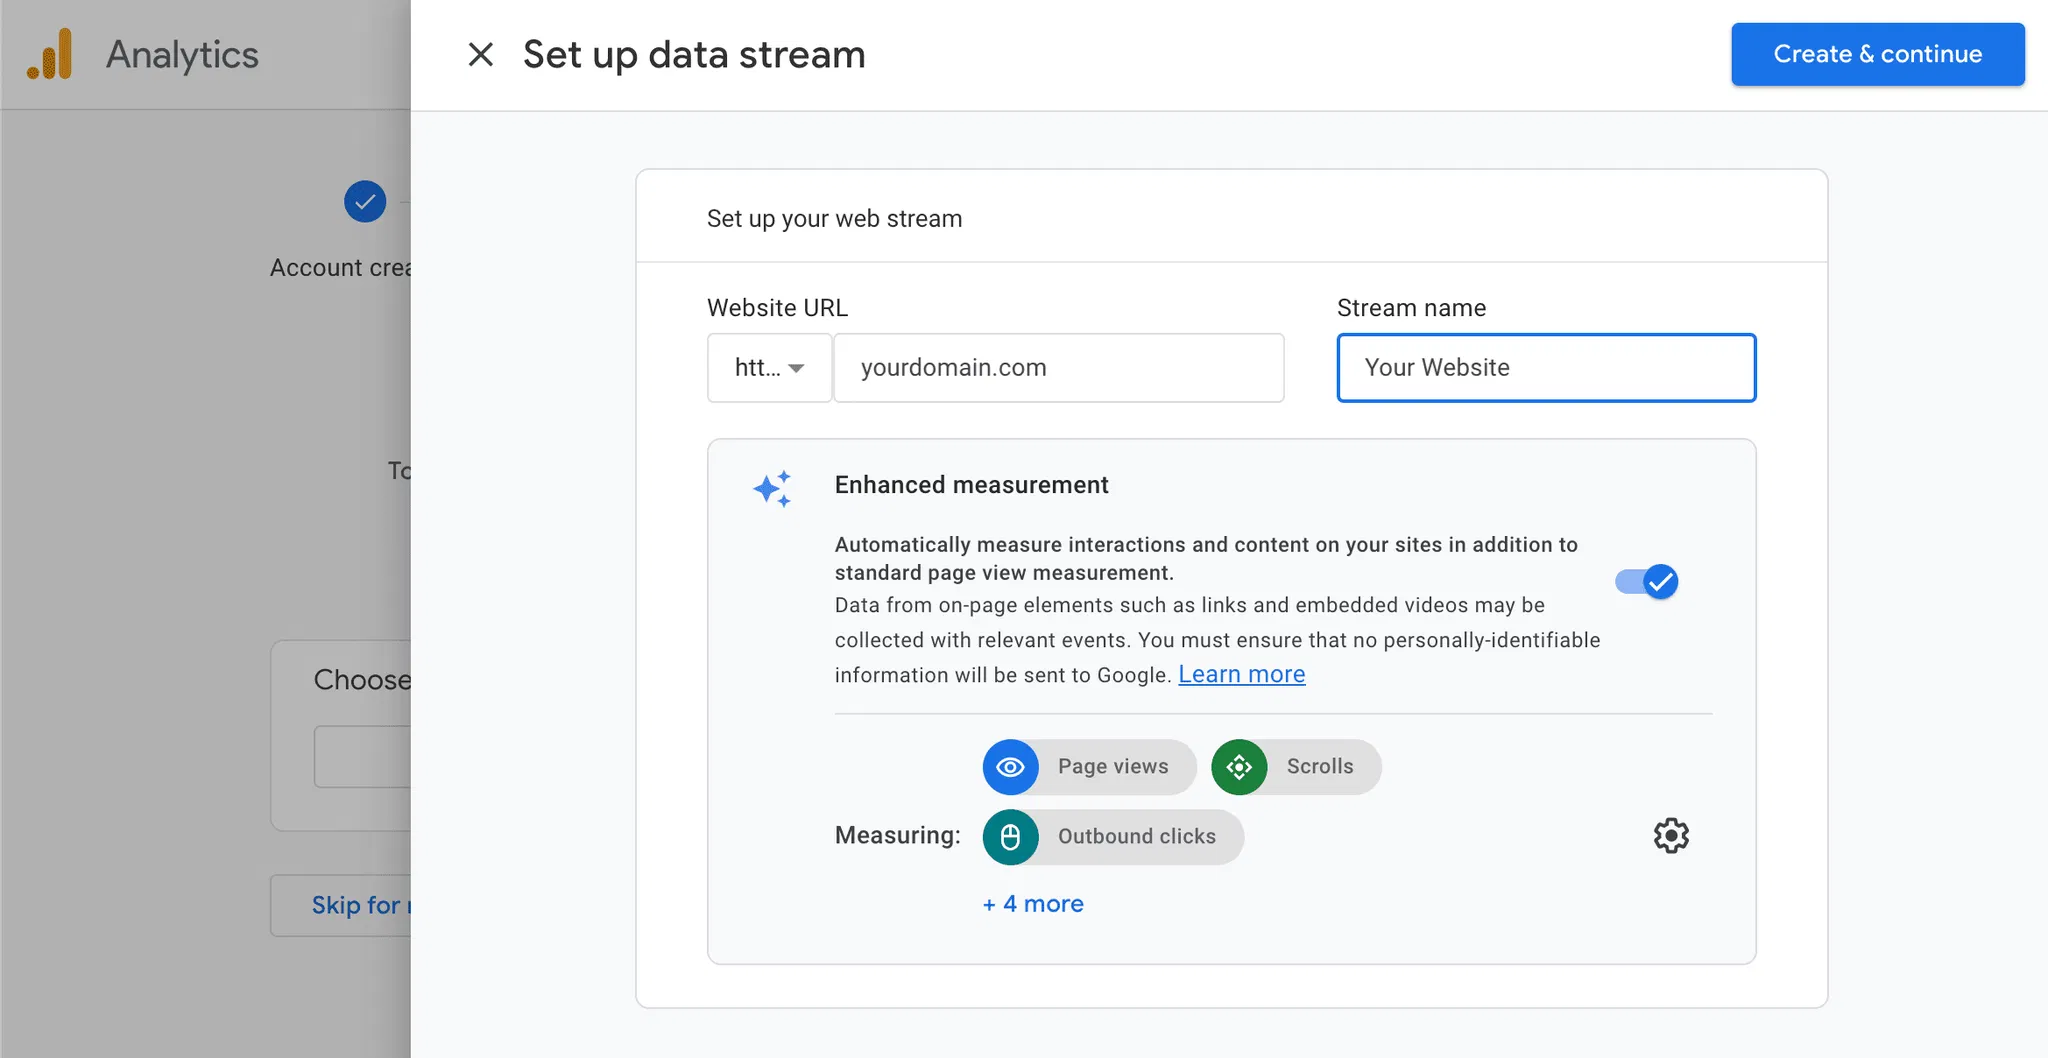
- Configure Data Stream: Enter your website URL and give your data stream a name.
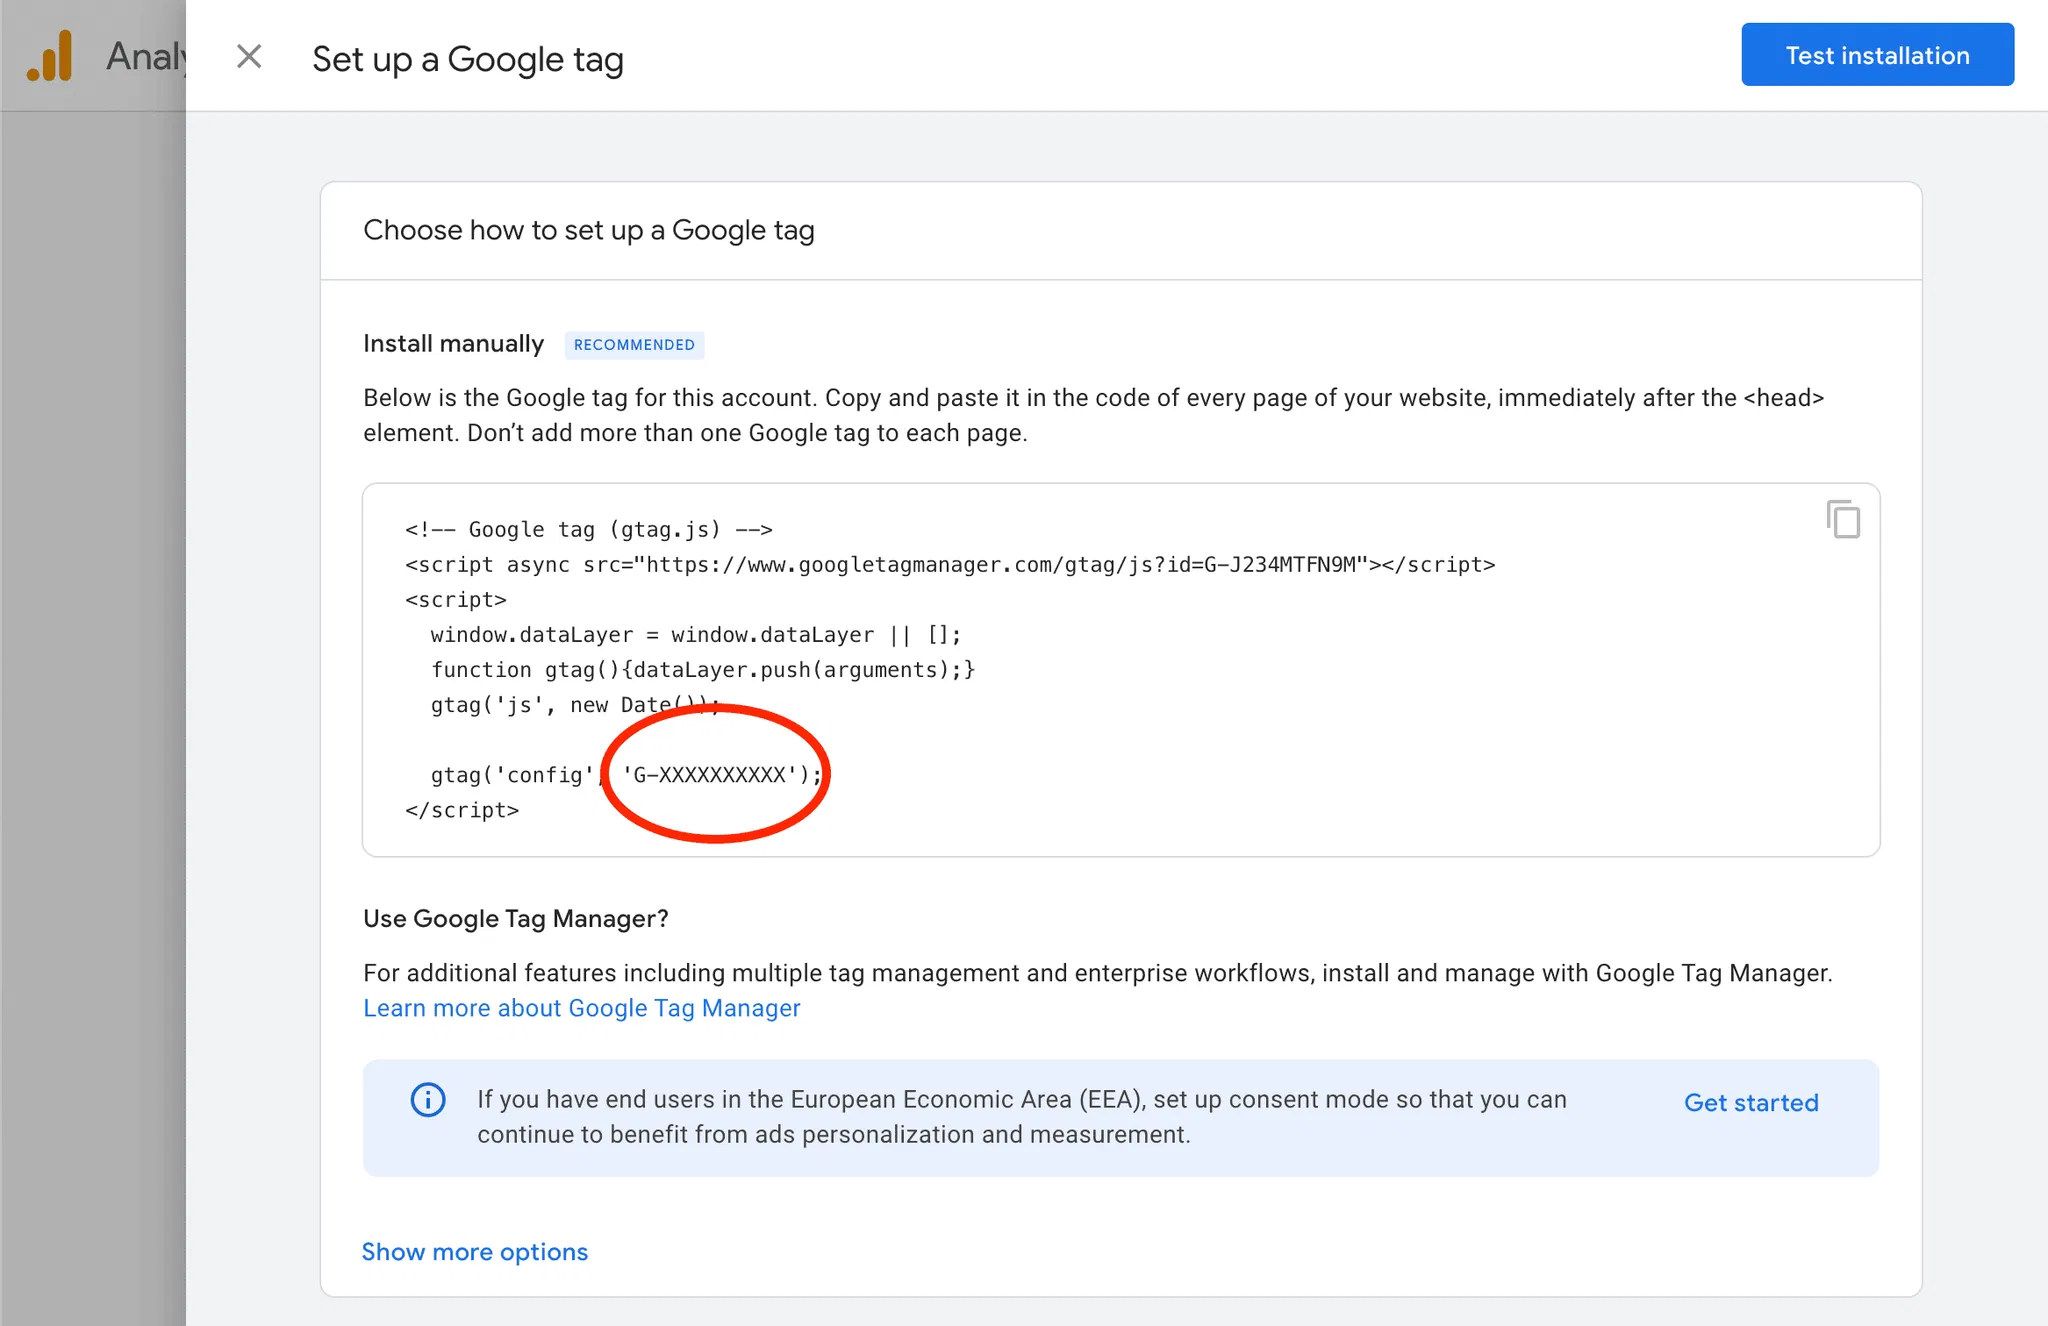
- Get Measurement ID: You’ll be provided with the installation script that includes a Measurement ID (starts with G-). Copy this ID.
Part 4: Add a Google Analytics Tag to Google Tag Manager
Now that you have a property in Analytics, it’s time to add a tag to Google Tag Manager to fire your Google Analytics tag.
- Add New Tag: Log into Google Tag Manager and Add a New Tag.
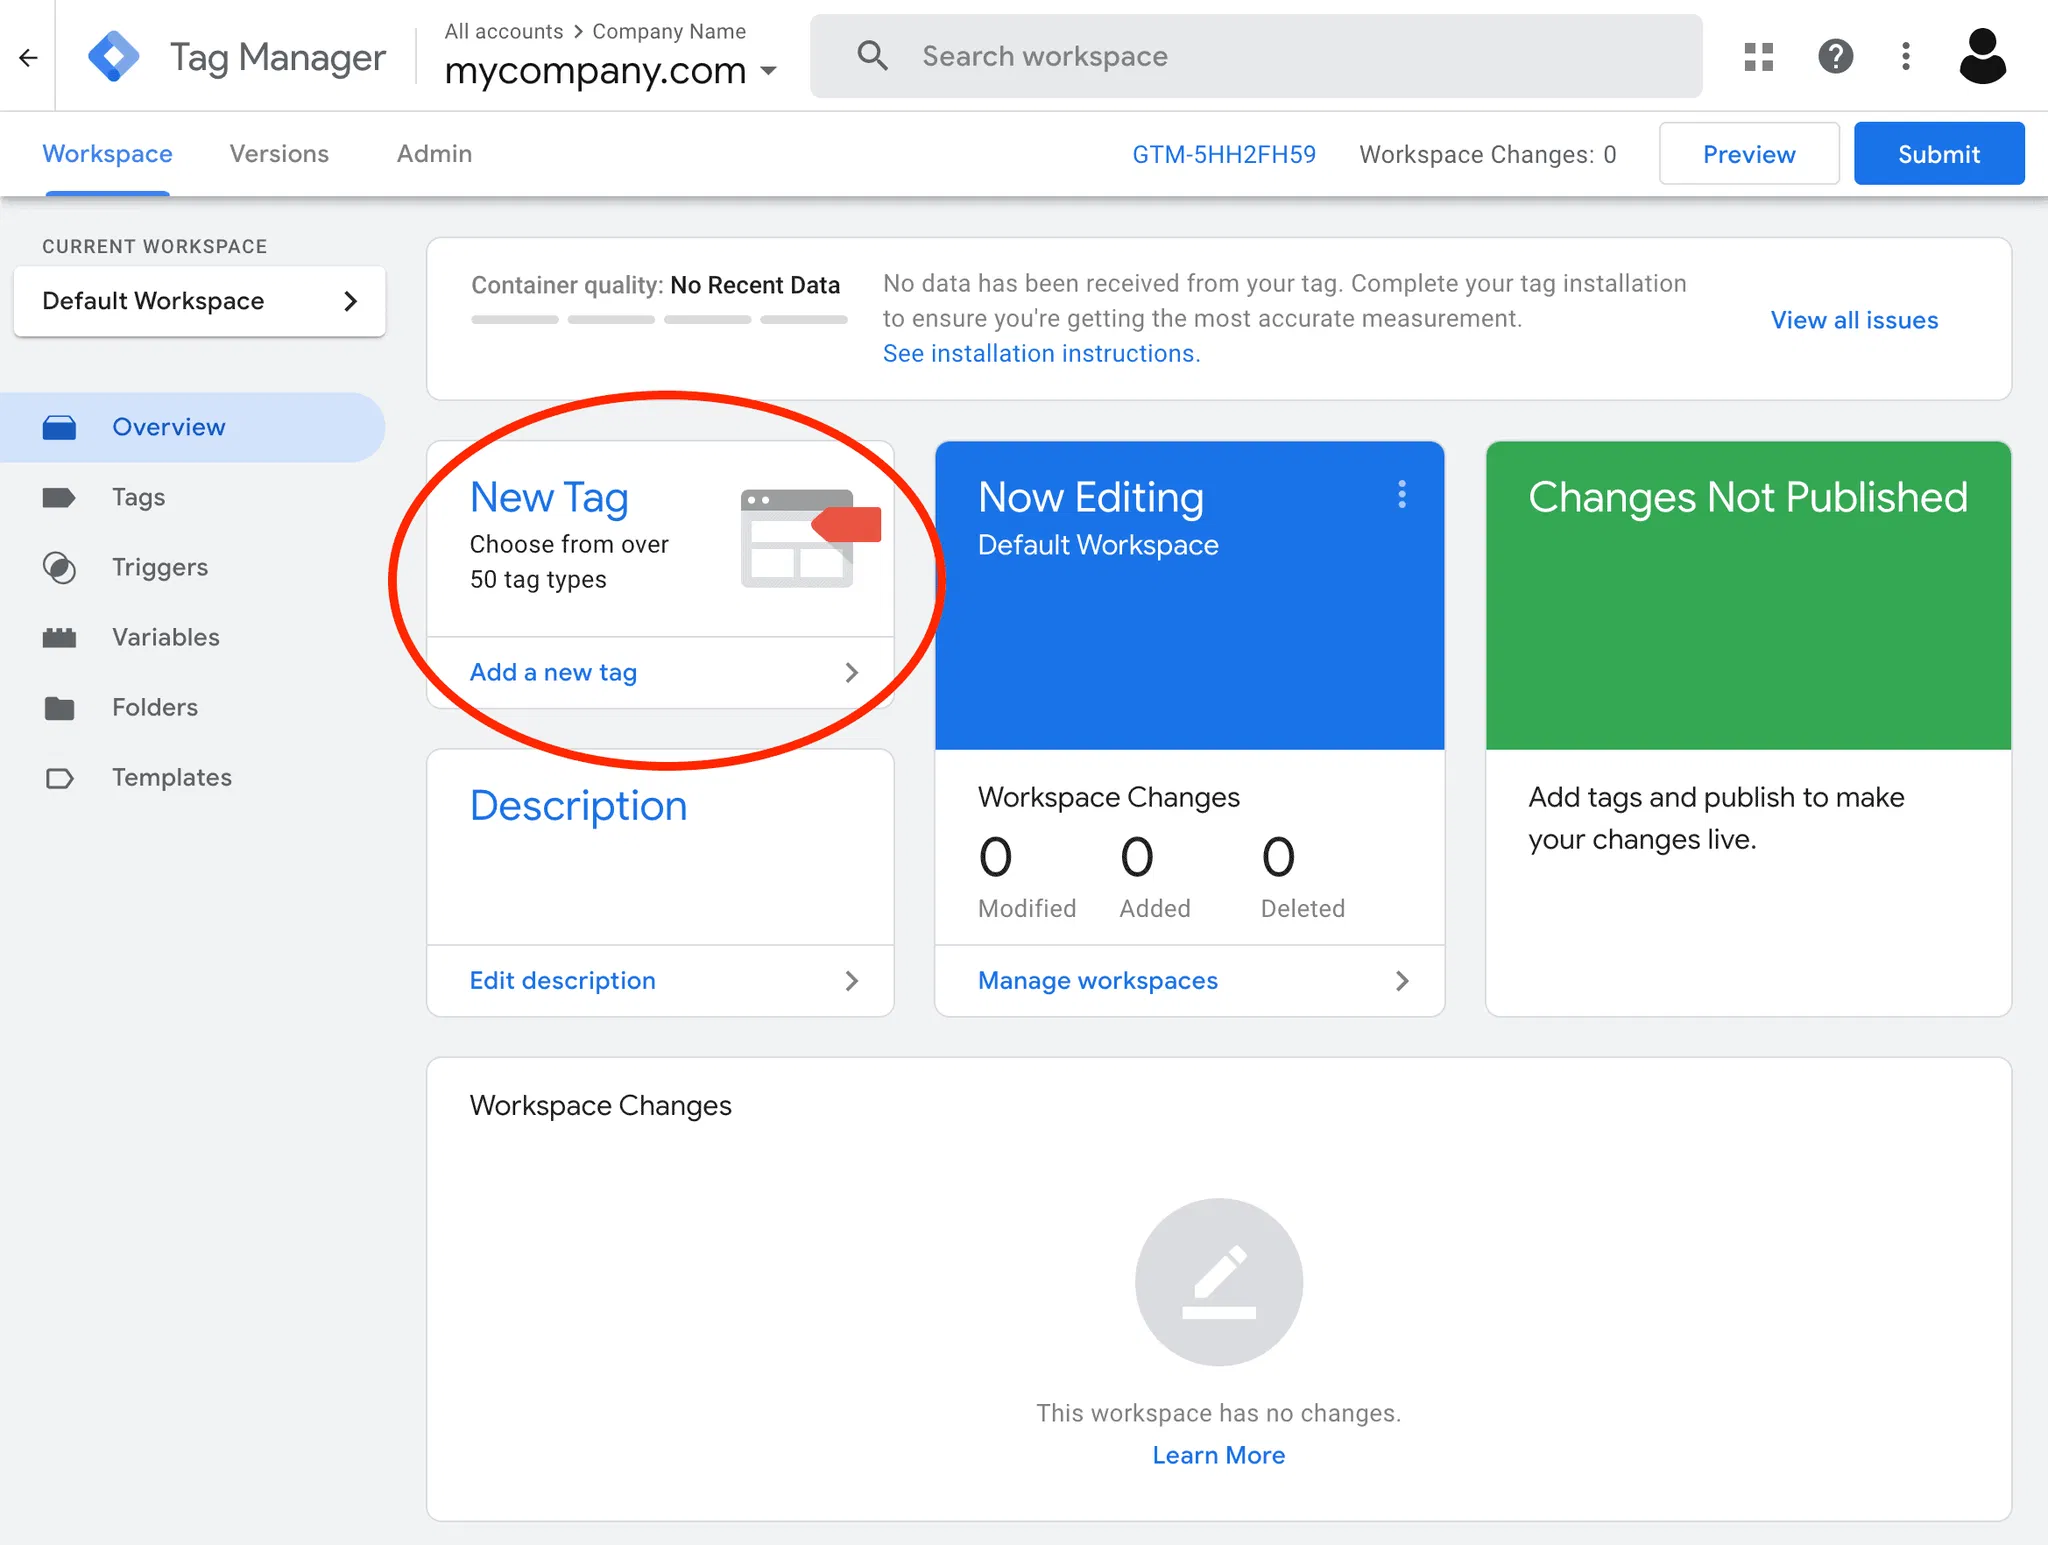
- New Tag: Click Tags and then New. Name your Tag.
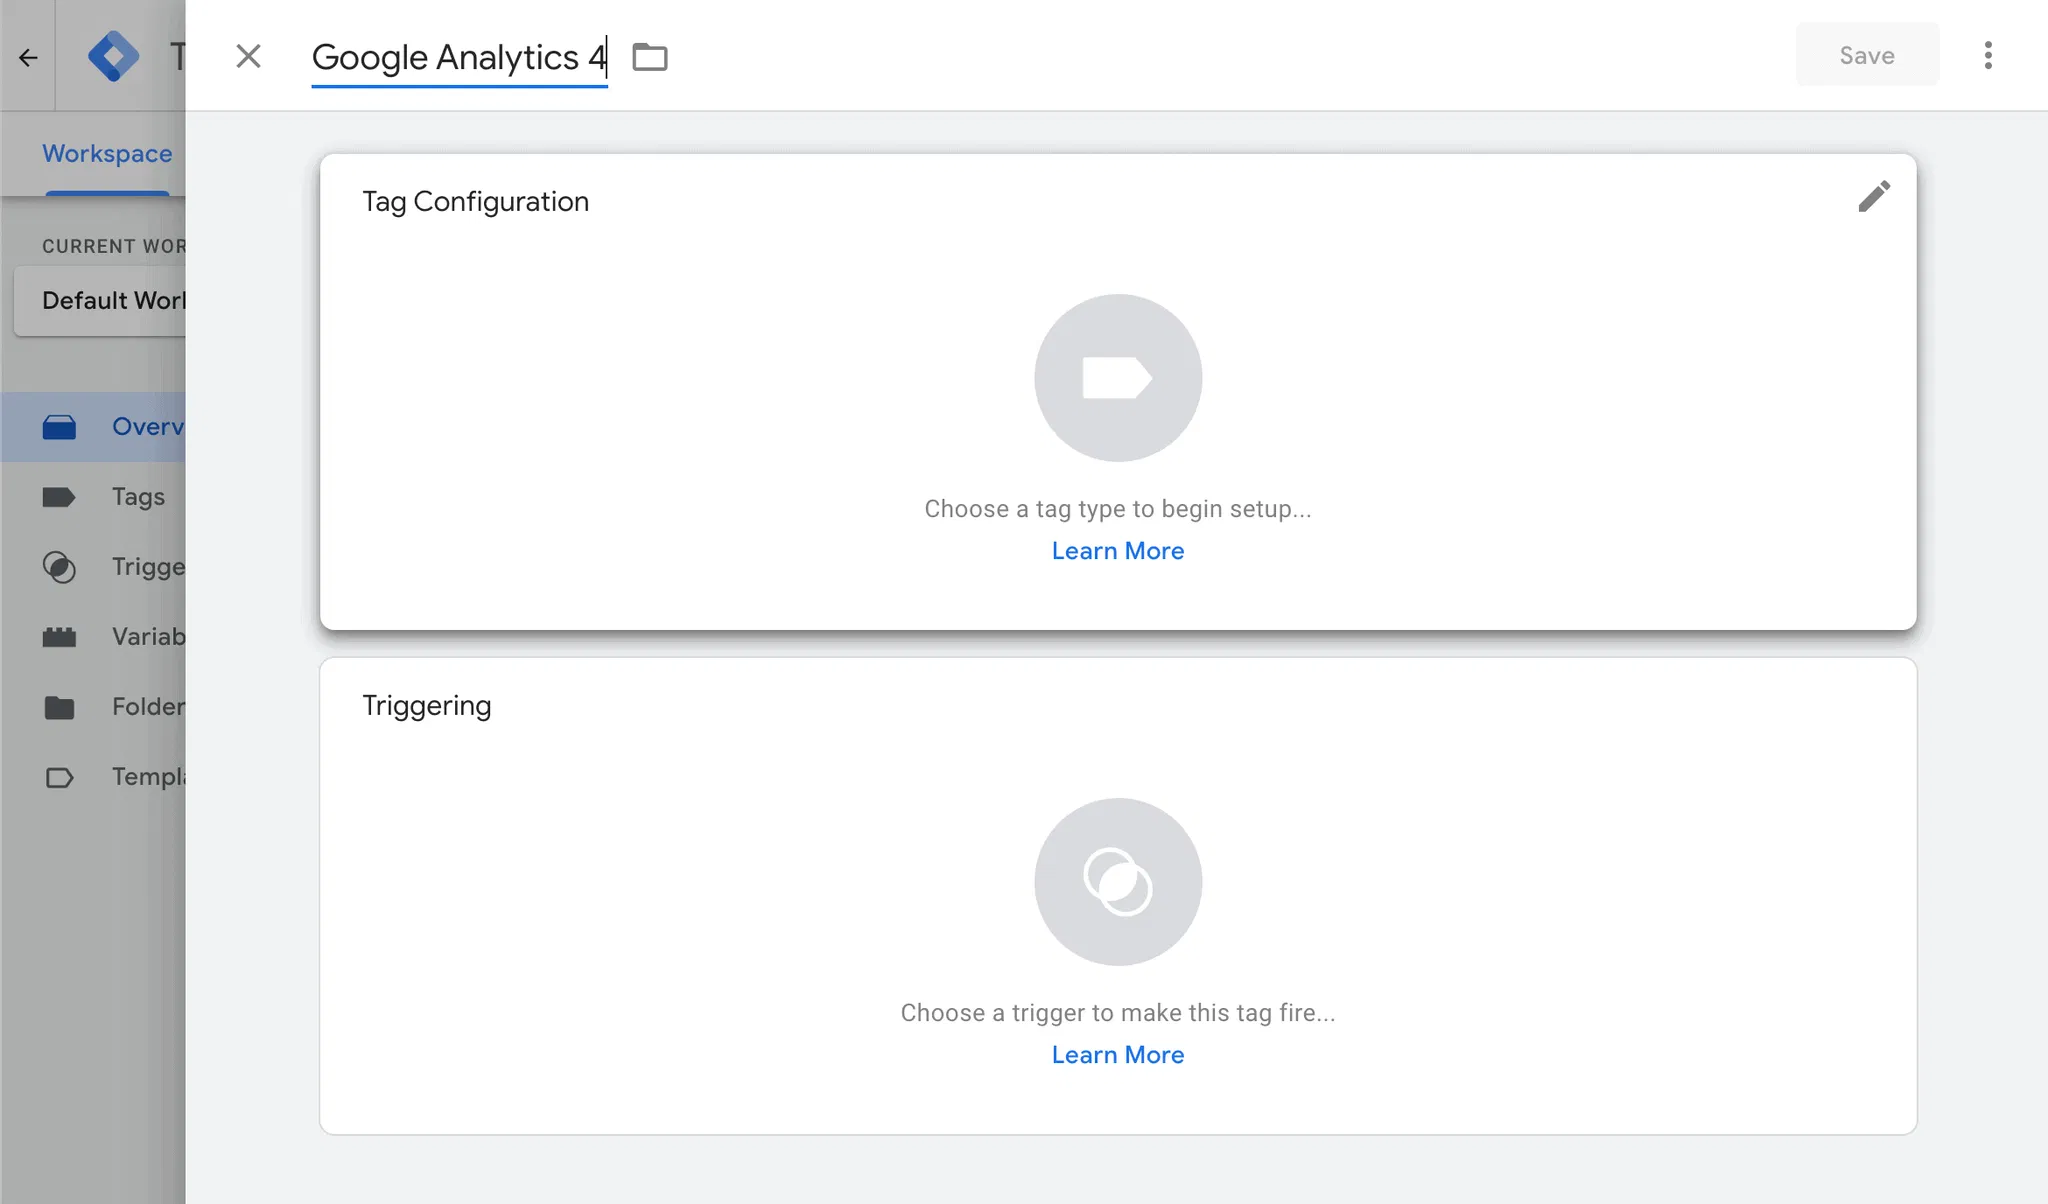
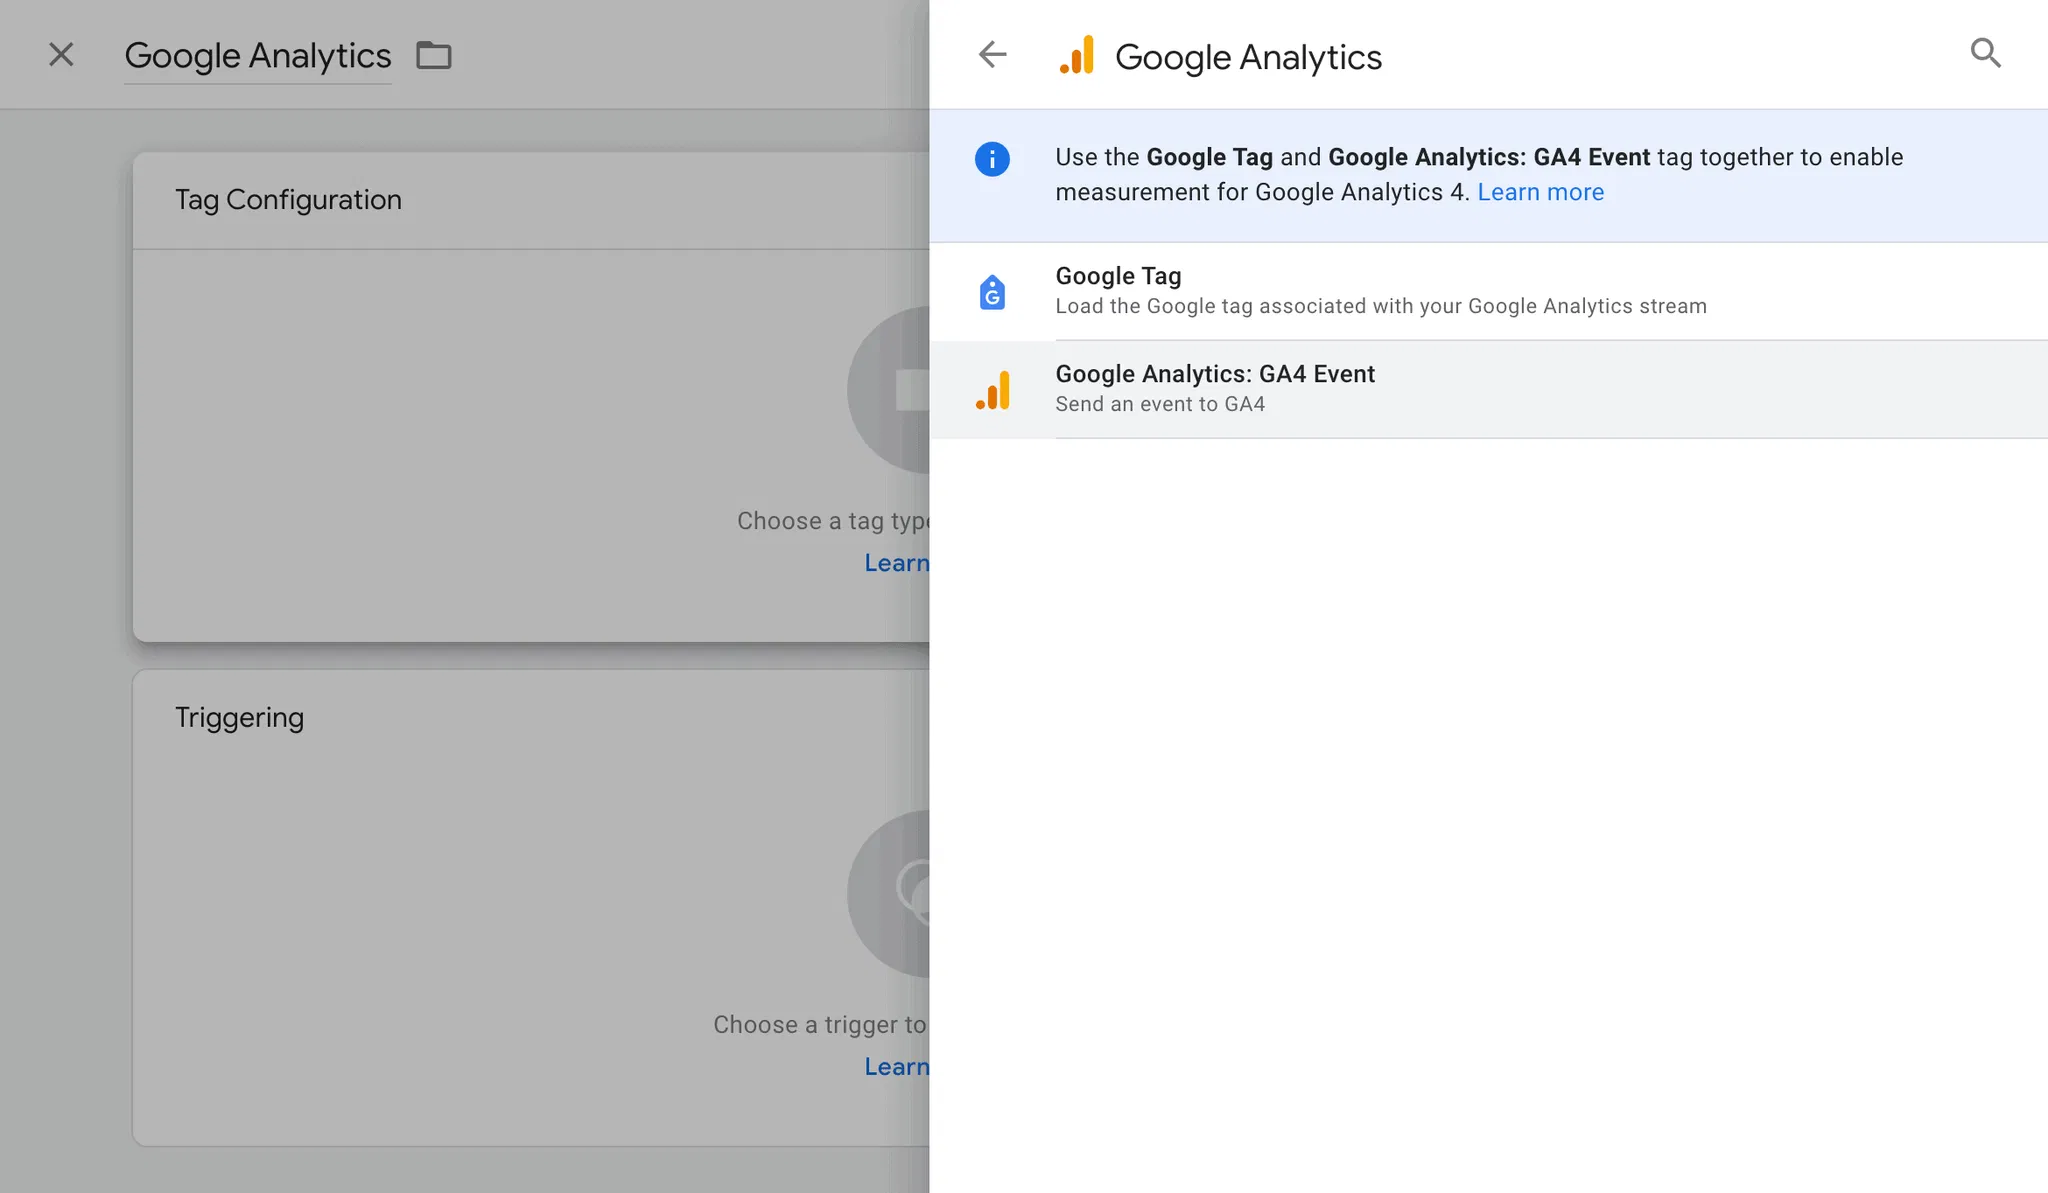
- Click Tag Configuration: Choose Google Analytics: GA4 Event.
- Measurement ID: Paste the Measurement ID you copied earlier
G-XXXXXXXXXXand select {{Event}} as your Event. - Triggering: Choose “All Pages” (this will fire the GA4 tag on every page).

- Publish Changes: Click “Submit” in the top right corner of GTM to publish your changes. This will deploy the GA4 tag to your website.
Part 5: Events and Key Events (Recommended)
You’re up and running with the basics of Google Tag Manager and Google Analytics, but it’s highly recommended that you now set up your events! This is where the real power of Google Analytics comes into play… the ability to identify your visitor’s engagement with your site to determine what is impacting conversions and what needs optimized.
- Events: Events are interactions users have with your website, like clicks, form submissions, video plays, or file downloads. GA4 uses events as the primary way to track user behavior.
- Key Events (Conversions): Key events, also known as conversions, are specific events that are important for your business goals, such as purchases, sign-ups, or contact form submissions. You can mark events as conversions in GA4.
Tracking events provides valuable insights into how users interact with your website beyond simple page views. This data helps you understand user behavior, measure the effectiveness of your marketing campaigns, and optimize your website for conversions.
How to set up events in GTM:
- Identify the Event: Determine what user interactions you want to track.
- Choose a Trigger: In GTM, create a trigger that fires when the event occurs. For example, a “Click – All Elements” trigger can be used to track clicks on specific buttons or links. You can set conditions for the trigger to be more specific (e.g., only fire when a specific button is clicked).
- Create an Event Tag: Create a new tag in GTM.
- Tag Type: Choose “Google Analytics: GA4 Event.”
- Configuration Tag: Select the GA4 Configuration Tag you created earlier.
- Event Name: Give your event a descriptive name (e.g., “button_click,” “form_submission”).
- Event Parameters (Optional): You can add additional information about the event as parameters (e.g., button text, form ID).
- Triggering: Select the trigger you created for this event.
- Name and Save: Name your tag and save it.
- Publish Changes: Submit your changes in GTM to deploy the event tracking.
- Mark as Conversion in GA4: In GA4, navigate to “Configure” -> “Events.” Find your event and mark it as a conversion if it’s a key event.
Part 6: Tag Firing Optimization
Optimizing tag firing is crucial for website performance. While GA4 should generally fire immediately to capture all user interactions, other tags, especially those that load external scripts, can slow down your website if they fire too early.
- GA4 Configuration Tag: This tag should fire on All Pages to ensure comprehensive tracking.
- Other Tags: Consider using different trigger types or delays for tags that might impact performance.
- Triggers based on user interaction: For example, if a tag is only needed when a user interacts with a specific element, use a trigger that only fires when that interaction occurs.
- DOM Ready or Page Load triggers: Instead of All Pages, consider using triggers that fire when the Document Object Model (DOM) is ready or the page has fully loaded. This ensures that essential content loads before less critical scripts. DOM Ready fires when the page’s basic structure is ready, while Window Loaded fires when all resources (images, scripts, etc.) have finished loading.
- Timers: You can use timers to delay the firing of a tag. This can be useful for tags not critical for the initial page load.
Why optimize tag firing?
- Improved Website Speed: Delayed or conditional tag firing can significantly improve your website’s loading speed, leading to a better user experience and potentially improved search engine rankings.
- Reduced Resource Consumption: By preventing unnecessary tags from firing, you can reduce the amount of resources your website consumes, especially on mobile devices.
- Accurate Tracking: In some cases, firing tags too early can lead to inaccurate tracking data. For example, if a tag relies on elements that haven’t loaded yet, it might not fire correctly.
Following these steps will give you a solid foundation for tracking your website’s performance and understanding your users’ behavior. Remember to test your setup thoroughly to ensure everything is working as expected. Google Tag Assistant (a Chrome extension) can be very helpful for debugging your GTM setup.


